IV, 200m 5.12c
Ryan Richardson & Niall Hamill
Mount Wilson, AB
August 20 2019
“Bengal Spice Indirect” was climbed ground up from a prominent ledge system at one-third’s height in the centre of Peyto Tower. The ledge was accessed via rappel from the main ledge system of the other free routes on the wall. On Sunday, the 18th the team fixed ropes down to the new ledge and began aiding and cleaning through the prominent roof system in the first pitch. Three bolts were added on lead, then another three on rappel. The second day saw Ryan aid-soloing the second pitch, adding two bolts, taking two solo aid falls while Niall cleaned and mini-tractioned pitch one. Niall then gave Ryan a break from the hard work of aid and switched to free mode on the remainder of pitch two, climbing to a belay stance and fixing an anchor. The following day, August 20, the team freed through the first two pitches (5.12c, 5.11c PG-13) that had been aided, Niall freeing both pitches on the first lead burn. The team then freed two more long pitches (5.10c, 5.8) on-sight. Reaching a belay below a final overhang, the team swapped leads, with Niall freeing the pitch on the second try at 5.11c PG-13, on all natural protection, a rarity in the rockies for the grade. One more short moderate pitch brought them to the broad scree ledge where all of the free routes on Peyto Tower have been climbed to, and the route was then rappelled on a mixture of fixed wires, pins, and a couple of bolts.
Description: Approach as for the “Marra-Richardson” listed in “Banff Rock” page 488-491 (Chris Perry, 2012)
The first pitch for the lower wall has visible bolts, climb three pitches (10c, 10d, 11c) as for “PG” (either the OG start in the crack or up the bolted face), “GR”, or “PS” to reach the main ledge. From here, walk 10m to the right end of the ledge and rappel with double 60m ropes from the first bolt of “Primordial Soup”, (Locker on biner) The ledge you are aiming for is very obvious, and some fixed rope links across the first exposed part of the ledge from a two bolt anchor to a two-pin anchor, from here the ledge is walkable, over to the base of the route, next to a giant flake leaning against the wall, where bolts are visible through the roof. The same two-bolt anchor found on this ledge is the rappel line. Two 30m raps (have the leader place directionals) (not recommended to link) will get you to the top of pitch one of the lower wall. This rappel line could be linked from the lower wall at a moderate grade, likely without bolts for the “direct” ascent, this is the “indirect.”
A reliable and easy rappel line for the upper wall is being developed, but is not yet complete. Consider rappelling any route from high up on this wall as an adventure, as ropes have been known to get stuck in the many dihedrals and flakes. Although all anchors are fixed for rappel with twin 60m ropes, walking off is highly recommended.
Rack: Doubles from micro cams to #3; one #4; set of offset wires, 12-14 draws including 8 slings, one screamer. Pins and hammer not necessary.

P1: 30m. Climb the first moderate 10m past two bolts and a pod that takes a #4 Camelot. Another finger sized piece can be placed before mantling onto a nice no hands foot ledge. Rest up here, as the angle kicks way back and provides a serious pump! If you make it through the first crux, shake out on some jugs before the final boulder problem in the roof. A blue alien can tame the spacing between the last two bolts, but was not used on the first free ascent. (6 bolts, fixed pin, gear.) Bolt and pin anchor. 5.12c
P2: 35m. From the anchor, step down, making a few reachy moves out left on a thin finger rail to better holds and a #1 Camelot placement. Incipient seam climbing interspersed with good face holds define this pitch. A bouldery section on crimpy face holds where the seams blank out lurks ahead, but thankfully there are two bolts and a fixed wire. Exiting this section, enjoy a good rest in a sandy jug pod (#2 Camelot) before a spicy traverse with small gear. The climbing difficulty eases off but climb carefully and place gear thoughtfully. A tad spicy, but safe. Bolt and pin anchor. (2 bolts, fixed wire, gear) 5.11c PG-13
P3: 60m. The beautiful 5.10 pillar/tower rises ahead, enjoy a 60m pitch of classy crack climbing, mostly hands, big hands and an exciting chimney finish. Save a big cam for the end! Be tactful with the rack on this long pitch. Fixed pin and nut anchor. (Gear) 5.10c
P4: 40m. A classy, moderate pitch. Enjoy the respite from the cranking, as it isn’t quite over yet! Mostly hands and chimney. Trend up and slightly left to a stance with two fixed wires below a right facing roof crack. (Gear) 5.8
P5: 20m. Climb a short right facing corner to a short roof encounter, with good gear (0.5, 0.75) before the roof. Crank the roof and mantle into some face holds, place gear carefully under a sandy flake, a good rest can be found while you de-code the technical sequence that unlocks the passage on thin holds to the fist sized splitter out of reach, out left. Once in the splitter, place a #3, breathe a sigh of relief, it’s easy climbing to the top. Split the final two pitches and the potential rope drag by belaying in a small chimney cave (#3, #.0.75, 0.5) The cave has incredible views out to Mt. Chephren! Relish in your success, as there is just one more short chimney pitch to the top. (Gear) 5.11c PG-13
P6: 20m. Continue up the easy chimney for 20 metres or so to the broad scree ledge of the summit plateau. A fixed pin and wire anchor can be found at the back of the ledge in some shattered rock. Rap to the top of P4, or walk off (recommended) (Gear) 5.5

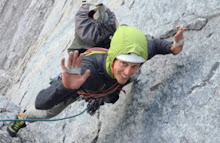
Ryan following pitch one.

Myself on pitch two.

Ryan on pitch three.

Myself on pitch five.

Base camp.

Advanced base camp.


